Sunday, January 3, 2016

New Years Goal: More Family Game Nights

Playing the Wii U with family made it feel awesome at night with the giggles and the togetherness. Hearing my son laugh and kick butt sealed the deal for me to bring the Wii U upstairs for more family fun. I like the idea of playing video games together. Both my boys chilled out more when we all got the chance to kick grandpa's butt on Super Smash Bros. Yeah I held last place most of the time but it was the fun and comradery that made it all worthwhile.

This year, I want to incorporate more board game time too. I made a sheet here to roll a d20 to see what games get played for the night. No fights, no pouts (even from the adults), just roll the die and see what will get its chance to be played. We can update the list every few months. For you readers, Go check out what is in your game cabinet and see what you can bring out for your family fun.

This is my starting list:

Games for Family Night (roll d20)
1. Pictionary
2. Munchkin
3. Kittens in a Blender
4. Pass the pigs
5. Settlers of Catan
6. Monopoly
7. BANG!
8. Aquarius
9. Rummy
10. Tsuro
11. Dread Pirate
12. 1000 white cards
13. Clue
14. Pirates! Ship game (plastic card miniatures)
15. Heroscape
16. Sushi GO!
18. Cthulhu Dice
19. Zombie Dice
20. Uno

My shelf needs to be played, we have another closet full of our RPG books too!

Thursday, October 22, 2015

Homework Savior!


Something many probably don't know about me is that this Gamer Girl is more a Gamer Mom. I admit that my gaming time is severely degraded as parenting takes over. When you have a child with special needs like Autism, its even more time dedicated to their wellbeing and less time button smashing on some classic console hits.

Middle school is tough. For both of my boys, there is a lot that changes, more work relying on them to do and less time to absorb it. This was troubling for my autistic child who found himself switched from a regular math class to algebra. He came home and had a meltdown over the fact his classmates had 2 months of work ahead of him and he had to catch up to be ready for upcoming tests.  I am trying hard to keep my cool as the tantrums came over the study worksheet of items he had little exposure to. I suck at all forms of math which was not going to help. He is relying on me, his mother, to help him in this moment of crisis. What would solve this for us?  I turned to the internet since he love videos. He is a visual learner.

I found Khan Academy and it was like the gates of heaven opened up and the Angels greeted us. We typed in the algebra definitions from his studysheet and we were amazed at the videos that popped up. The guy who was showing the lesson wrote in various colors on a blackboard that made us focus in on this information. It didn't deter 2 natural squirrels from the screen. I like this mystery guy.

I was relearning the lessons alongside my son who was staring in awe at the video. You could see the light pop on in his head. It looked like he was about to have a purple cloud of POOF as his mind was blown by this new learning aide!

Thank you Khan Academy, thank you for making this easy on both of us.

My other son was studying for Science on Mitosis. We found videos on that to accompany his studysheets. A friend of mine on facebook said her 7yr old son lives on Khan Academy, it has videos he can understand and he is zipping through right into the stuff he will learn in school probably 4 years from now.   This site is amazing!  

best part?     ITS FREE!!!  

If it can keep a ADHD squirrel Mom's attention, and autistic hormonal teen, and a super brain elementary child busy, it will do wonders for you. Any age, Any subject.

go check it out on your computer or your handheld devices.

https://www.khanacademy.org/

Thursday, October 15, 2015

Fizzgig!!


I wanted to try something different with my projects. I love working with various mediums and in the past 2 years I have started a Facebook Artist page to show some of my creations with the hopeful intention of linking my online store to that webpage.

My Artist page is located here:

https://www.facebook.com/Talahandra

I think I found a way to mix two mediums I like.  Combining crochet with polymer clay, I can get something cute, well, cute from my perspective :')

You see, my sister and I love movies like The Dark Crystal and Labyrinth. I am a major Froud fan. Bad part is my sister is also a big fan. We recently had this wistful fight over the Fizzgig auction as to who would get the original. Hate to break our little fantasy but both of us cannot afford a $10k starting bid. Next option?    I made her one for her 16th birthday.

What do you think?


My sister and her new buddy :')

I think I found something that takes awhile to create but the results are just too cute to put down. Now I need to make one for myself. She cant have all the fun!

Sunday, October 5, 2014

Pattern Review - Enderman Hat

Good Morning Folks its Tattiana here at Gamer Girl Universe.

I was talking to a great designer Debi Dearest (at http://dearestdebi.com/) and I received some humbling advice.  My blog is not going to get anywhere unless I start posting on a regular basis. If you are taking the time to come over here and read for new ideas then you should be getting something that is updated more than a few times a year. I think my problem was that I was in the mindset of putting up all my created designs but didn't know what to do when I was having fun using other people's patterns to make gifts for other people. Debi told me that I can still enjoy working on other people's patterns but I could do a review of those patterns here.

Well here goes nothing :')

First review I would like to do is on a pattern/graph from Sick 'Lil Monkeys that can be found at
http://www.ravelry.com/patterns/library/sack-beanie---minecraft-enderman

I haven't worked much with other peoples graphs before and felt it was time to learn. The pattern is currently running at $9 dollars. I recieved this pattern for free a week ago during a promotional sale. Her store has some really cute things here if you are willing to pay the price noted for those patterns.

What I received was a fairly well written PDF file (which showed up quickly as do Ravelry downloads do). What set me back was the fact it was a 3 page PDF (1 page for a large picture of the model wearing the hat, 2 page had the basic starting information/legal jargon, and page 3 was the graph and instructions.) You could fit all the needed to know information on 1 page.

Following the graph was fairly simple except for the stitch count X ____. I wont say what those numbers are here for the integrity of the paid pattern but that step was confusing to the relative overall size to be created. Hindsight says this was all one piece. In the end, it was sewn on two sides (top and side). Oops!

I ended up making 2 blocks (one with the graph and one blank for the back of hat).  My son didn't want the grey colors so I turned those black. He wanted "arms" so I made those too.

After completion, I pretty much used the pattern as inspiration to a totally modified version/artist's interpretation of the original pattern.

What I think would help make the original better is more clarification on the one step to emphasize to the reader this pattern is made in one piece. Everyone else may not have that trouble but it may help those new to graphs and making that style hat (I've always made my hats in the round before this).   Lastly, put all instructions on 1 sheet so its easier to take one page for on-the-go crocheters. That's more for cosmetics sake and ease to the user, nothing more.

I am glad I got this pattern for free. My son is grateful to have his hat :')


UPDATE:
The designers have really improved their patterns since this posting. Don't be afraid to give them a try. Like everything in life, you won't know what needs to improve if you don't get out there and do something. Nothing is perfect and sometimes how you communicate your directions may not be how a person on the other end understands them. 

Sunday, December 8, 2013

Crochet Geekery


Good Snowy Morning!

Here in Bellevue, Nebraska, we are seeing some significant snowfall for the start of the holiday season. Significant?  At least 4 inches will be dropping by tonight.  I know there are neighbors to the northeast will probably see more but its an important turn of events as I try to get our adopted member of the family out into the snow. For a toy fox terrier, this is becoming a chore.

I would suggest to you dog lovers checking out this awesome site for crocheting dog sweaters.

I learned to crochet some cute things there to keep my poor pup warm. Now if I can just get him to the shoveled green patch...

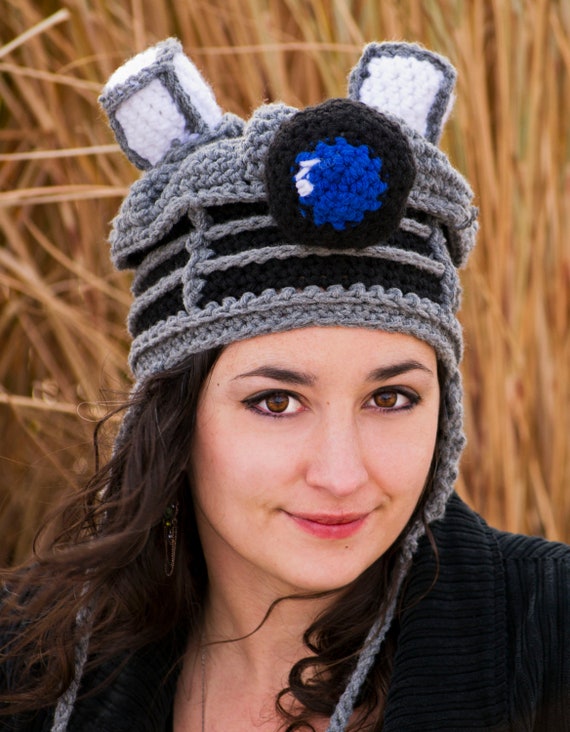
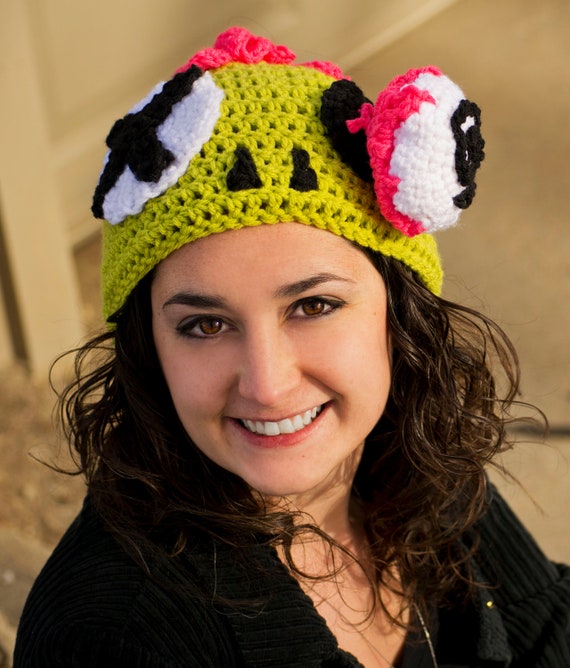
For our human companions, I have a friend out here that is amazing at making some great geek headwear. Her designs are full of detail, bulky for warmth, and they always turn heads when her gal wears them.  If you do not have time this season to crochet another project on your holiday gift list, I suggest you head to Snark Creations on Etsy.com to purchase one of her beautiful pieces.

I love this Dalek hat of hers
For the Zombie enthusiasts
Please go to her shop and take a look. There are things here for the Geeks and some very practical cute things too.

Please be safe folks. This Season has started out with some very interesting drivers on the road. Make sure you have an emergency kit in your car stocked with some granola bars, a flare kit, a blanket and a small cooler with water so it does not freeze when you need it the most. Check your tires to see if they are properly aired up and have a decent tread.  Give yourself extra time when traveling and please make sure you have ample distance between you and the car ahead of you. At least 3 car lengths between you. If you are going faster on the highway, make that number 4 or 5. 

Happy Holidays, and keep creating!


Tuesday, September 17, 2013

Heroes of Cosplay??? More like Drama Divas of Cosplay


What has happened to our lovely world of creativity?

I am sorely disappointed tonight with the season finale of "Heroes of Cosplay" on SyFy. I watched in hopes that I can see my friends who went to Planet Comicon and perhaps catch a glimpse of their beautiful talent on a network TV. What I seen and what has hit home with friends makes me want to smack someone into sensibility.

When you become famous, shouldn't you remember your roots? Yeah I'm sure with a team of experts at your side, TV cameras in tow, your vision may be askew-ed by the lights in your eyes but has your manners and upbringing gone away?? Didn't your parents teach you better?  You may be the master but there are many padiwans about that would like to be inspired by you, not scoffed aside as you wander through. I had at least 3 friends snuffed by the entourage of these "Heroes", one was pushed out of the way by these people as if common trash. Did they know they just snuffed some of our most creative props designers in Omaha!!

For another thing, this show is being portrayed in the wrong way! Most of us create months in advance our costumes, not this Fedexed last minute bull you see on this show. Also, having local talents edited to paint a scathing picture just for drama's sake is completely uncool.

I encourage all of you to follow the posted link to a lady that was seen in the finale as the"villain". A female Dr Who character that was having some choice words with the "Heroes" backstage. There are two sides to each story and hers is far different from what was aired on the show.

http://wow-lawbringer.blogspot.com/2013/09/my-life-as-villain-of-cosplay.html

I am hoping this season finale is the series finale. SyFy is feeding itself too much on recreated dramas instead of reality. You know things were starting to go downhill when they started airing Wrestling as part of their lineup. If you are going for drama folks..... why not bring back something more wholesome and worthwhile to watch....like Firefly :')   (yes yes I know it can't be brought back but hey we can hope)


Saturday, July 6, 2013

Hello Kitty Inspired Beanie

Well Folks.

Its about time. I am making the Hello Kitty beanie free to the public. Here's the pattern but since this is one of my original patterns the copyrights still apply. Please link to this pattern if you are showing on another site to give credit where due. As to selling?  Be careful! This is a copyrighted kitty because of its name, shape, and even the bow by the company laws say its copyrighted. How do I know?  The letter in my gmail inbox.

So I caution you to do as you will within reason. But the pattern itself is my own that's the only part that's technically mine. Any questions about what to do or about the pattern instructions, email me and I will assist as best as possible. Happy Hookin!

Hello Kitty Beanie

By Tattiana Talahandra  - September 2010
A variant from those currently seen on the web. Here’s my rendition. Please note copyright
following the pattern.

Difficulty Level is EASY

For this pattern you will need basic knowledge in Crocheting. In this pattern you will be working
in rounds. For the basic beanie, you will be creating a Ring with DC (double crochet) stitches. For
more information,

I found websites like crochetpatterncentral.com and youtube a big help.

Abbreviations:
Ch= Chain
SL= Slip Stitch
SC= Single Crochet
DC= Double Crochet
HDC= Half Double Crochet

Supplies:
Hook size H
Worst weight yarn (a skein of each) in White and Pink -- I used Caron’s Natura in White and Soft
Pink
2 Black Buttons - I used La-Petite #769 size 9/16 found at Hancock Fabric
Scrap Black yarn for whiskers later
Scrap yellow yarn for the nose
Small bit of Polyfill fiber for stuffing the ears

Basic Beanie
Last round of your hat use pink to give it a nice finished edge
Create Ring
1. Chain 3, SL to join
2. DC 10 in the ring, SL to join

Rest of the Beanie you will be working with rounds in the ring you created.
Round 1: CH 2, 2 DC in each stitch. Around. SL to Join (20 stitches)
Round 2: CH 2, 1 DC then 2 DC in the next stitch. Around. SL to join (30 stitches)
Round 3: CH 2, 2 DC then 2 DC in the next stitch. Around. SL to join (40 stitches)
Round 4: CH 2, 3 DC then 2 DC in the next stitch. Around. (50 stitches)
Round 5: CH 2, 4 DC then 2 DC in the next stitch. Around. (60 stitches)

**Round 6: CH 2, 5 DC then 2 DC in the next stitch. Around. (70 stitches)
**If making for a smaller head then skip round 6. If making for a larger head then proceed with
round 6 and if you need to make it larger, add another round (ex 6 DC then 2DC in next stitch, 7 DC
then 2 in
next stitch….etc) until the hat is wide enough for the intended head. On the ones I have made for
people, I haven’t gone over 5 DC then 2. Who knows… you might have someone who has a big ego, in
that case, you may need more yarn :’)

Round 7- 16 or more: CH 2,  1 DC in each stitch around. Continue making rounds until the beanie is of a
desired length for the wearer.

Ears (Make 2)
Use white yarn to start with
1.  Chain 3, SL to join
2. DC 6 in loop (7 stitches)
3.  2 DC in each DC (14 stitches)
4.  1 DC then 2 DC in the next stitch. Around. (21 stitches)
5.  2DC then 2 DC in the next stitch. Around (28 stitches) Finish off then turn inside out for a
more finished look


Bow
ch 25
Row 1  Ch2 then HDC across (start in 3rd Ch from hook). Turn
Row 2: Ch 2 then HDC across
Stitch ends together to form a cuff
I wound white yarn about the middle to make it a bow.


Assembly


Assemble as shown…..When it comes to the ears, you want them slightly oval when sewing them onto
the hat with a yarn needle around the bottom of the ear. Don't forget to add a small bit of
polyfill before you secure it firmly. If unsure how put the ears on, flatten your hat and then
guage how high you want them on your head. Place those ears on the flattened edge.
Add your little crocheted bow to the ear.  Sew in place
Add some yellow yarn or black yarn for extra touches or leave plain….up to you. Sew in black
buttons for eyes and there’s your hat!

This crochet pattern is copyright of Tattiana Talahandra (September 2010). DO NOT reprint this 
pattern, or post it on any other website. You may make a copy of this pattern for your own personal 
use, but do not include it in any collections, website, or cds. You are welcome to link to this 
pattern and if you post your own pictures of what you create, please credit accordingly and include 
a link to this original pattern.

Wednesday, June 19, 2013

A Day in the Life of AHHHHHHHHHH!!!!


Good Afternoon Folks

Please don't flog me yet (unless its made of yarn). My computer equipment was recently under 6 inches of water and I am finally making my way back onto the internet.

Good News?   All my yarn stashes were exempt from the muddy fingers of my basement flood. For once my attempts of organization pad off in my craft room so the things on the floor were minimal when the waters came in. My yarn was neatly tucked away by colors in their respective file boxes in a closet.

During my downtime, its come to my attention that my quiet blog gained followers from the recent influx of BBC viewers. I guess there are more like minded crochet people out there wanting geeky things made. HOORAY for US!!

Since certain hobbies of mine were taken away with the flood, its time to focus on the important things like crochet projects and things we need for the holidays. What this means for you lucky viewers is more patterns will be added to this site soon.  We need things that you can whip up in a pinch for people! I want people coming here to feel like they can create just about anything. You do not have to be fancy to make something memorable for your kids. I wrote down a few ideas on paper and crafted some things but I need to get the drafted works up here for you to read.  Crochet projects and a plastic canvas project I would love to see if you all can make something with.  I will still focus on gaming, geeky, and nerdy chic fun.

So stay tuned for more antics.

Tuesday, May 14, 2013

May Britishfest BBQ

Hello Everyone!!


The following is an announcement from the founder of Britishfest :

On May 25th, the Britishfest team is proudly hosting a BBQ cookout in Bellevue's Washington Park. It is encouraged that guests who are attending the BBQ bring a covered dish (excluding chips and 2 liter bottles of soda, no alcohol allowed) or to make a donation to help Britishfest become the best convention we can make it. There is also an opportunity to purchase weekend memberships at the BBQ and feature an exclusive Memorial Day BBQ discount of 10%. There is a list below of items that we still need which will be updated daily. Follow the link below to get your VIP in today.

https://www.facebook.com/events/513818391983631/


What is Britishfest you say?  its a new convention (in 2014) that is celebrating British entertainment! From Dr Who to Discworld. From Monty Python to The Prisoner.

Check it out here

http://britishfest.weebly.com/index.html

Wednesday, December 12, 2012

Turkey Curry


When it comes to feeding the masses for a Game Day, I find that I have several allergies to worry about and others who are trying to eat healthy. With this being holiday season, I found a really neat way to give your friends something good to eat and get rid of some leftovers.

Ingrediants: 

1 brick of Golden Curry
(when I say one brick I mean half of this package pictured below)

2 Cups of chopped/ shredded turkey (can substitute for chicken)
I can of sliced pineapples (can substitute for chopped pineapple too)
1 box of bow tie pasta
2 cups milk

To create this, break the brick of Golden curry into smaller pieces and melt in a saucepan with the juice from your canned pineapple. Mix up well then add in the milk to the bunch. 
Next add your turkey to the sauce. Let this simmer on medium for a few minutes.
Chop the pineapples into small bite size pieces to add to the saucepan. If you cheated and grabbed a can of chopped pineapple then just add it to the sauce. Let all this simmer while you boil up the bowtie pasta.
Pour sauce over cooked noodles. Enjoy!   


Serves about 6 people but my kids pretty much ate it all. 

Sunday, December 9, 2012

Night Sky TARDIS Scarf


Happy Holidays Folks!
Yes, I understand I have not been about lately to post something cool and amazing in this blog. I was…uh…. In the TARDIS and doing a lot of traveling with different companions! I couldn’t figure the controls and I ended up back to posting in this blog 2 years later… yes…..yes that’s it!
To make up for the time loss, I am posting a work in progress that I wish for all you to create, make, and wear for the Dr Who Holiday Special.
The hard part about this scarf is the time consuming part of adding details. The main body is easily worked up in an evening but I must have spent a few hours single crocheting on top of the base scarf the black details and also whip stitching and weaving in the other sewn in details (like attaching the felt squares)

The Night Sky TARDIS Scarf


Materials:

1 Skein of Red Heart BlackFleck
1 Skein of Red Heart Blue
1 Skein of Black yarn (for trim)
a yard of white yarn (for light)
4 White Felt Squares (3in by 1 3/4 in)
1 tapestry needle
Scissors
Patience

This pattern is meant for someone who has a working knowledge of the basic stiches. There are great videos on Youtube and on Crochetpatterncentral.com for instructions.
We will be using the Following:
DC = Double Crochet
CH= Chain
SL= Slip stitch

Starting with Blue Yarn
CH  22
Row 1:   DC in CH 2nd from the hook. DC in each stitch across, CH 2, Turn
Rows 2 – 29: DC in each stitch across, CH 2, Turn
Row 30: DC in each stitch across, CH 3 in Fleck yarn, Turn (this is where we  do our color change)
Rows 31 – 89: DC in each stitch across, CH 3, Turn
Row 90: DC in each stitch across, CH 2 in blue yarn, Turn (this is where we  do our color change)
Row 91- 119: DC in each stitch across, CH 2, Turn
Row 120: DC in each stitch across, Bind off.

I used black yarn to outline the body of the TARDIS by single crocheting around the top of the TARDIS body. This is done by using the stitches on your TARDIS body as you would a foundation chain. I did this my eyesight so take your time and keep your stitches loose (not too tight) as you work your way around the crocheted piece.

The black bar at the top of the TARDIS where you normally see the “Police Box” sign I weaved black yarn through the stitches with a tapestry needle. It took about 4 rows woven in and out of the yarn to make what seemed like a satisfying black bar for here.

My White Felt squares for the windows I cut 4 approx 3 inches by  1 and 3/4 inches
I sewed them into place once again with a Tapestry needle. This may take some elbow juice on your part doing so since the felt is a little tough…..well…. it’s probably because I also used some Fabric glue and lightly glued them in place so they wouldn’t move on me later when sewing them in place :’)

The door panels I outlined with black yard using a tapestry needle once more.

The light on top of the scarf is done with scrap white yarn and blue yarn. Use a tapestry needle to weave your yarn in and out of the crocheted piece to create the light. Optionally, you can replace the sewing of the light and glue in a felt blue and white piece to the top. Whatever works best for you.

This is my rendition of the TARDIS, Whats yours? 

This pattern is copyright Tattiana Talahandra December 2012 and can be used to create gifts for your friends and family. Please do not sell creations from this pattern without author’s permission. Really folks, I am a nice lady but there are people out there that like stealing other peoples works and calling it their own. Please site credits back to this blog or Tattiana Talahandra.

Dr. Who and the mention of TARDIS in this pattern is copyrighted to BBC and its creators: Sydney Newman, C.E. Webber and Donald Wilson.  I hope this serves as free advertising so they make money off all those viewers soon to be watching the latest Holiday Special.

Sunday, June 12, 2011

Absense and Nonsense

Good Afternoon Folks

Sorry for the long absense but life became very busy for me out here in Omaha. I went to the Non-Commissioned Officers Academy for the Air Force. Found out quickly that bringing along my crochet projects was a bad idea. I wasn't able to do any of them while out there with the massive amounts of study materials we were given.

Good News, life is nuts but heading towards a manageable level. My friends and I have a few projects we are coming up with that I hope to be posting the ideas here soon. One idea is a simple for creating 8-bit blanket designs. With 8 bit games, think in blocks......lots of blocks.  Now go look on the web at some of your old favorite games from Atari or the First generation Nintendo games.  Got that picture?  Ok  now go get some grid paper and take that image and put it to grid form. .......     you seeing what I am seeing yet?      There is a whole realm of cool patterns you can create using some nostalgic game references.


To do these things you need to know your basic stitching like single crochet, creating rows, and following a grid pattern. To do such you also need to know how to change colors in the middle of the row so look up the "tapestry stitch".  I found the best lesson on how to switch colors came from the book "Stitch and Bitch Crochet: The Happy Hooker".  If you can do the above then you are on your way to making cool retro gaming patterns yourself for block blankets, shirts, and whatever your heart is set on.

Go try it!

Tuesday, February 1, 2011

We Moved!

Good Evening All

I am still alive. I haven't forgotten about you all. In the past month alot of crazy things have happened to me here. Due to some relationship changes, my sons and I have moved.  We been spending the past few weeks packing and unpacking boxes. I have found most of my craft things and I am playing once again with my yarn.  Its amazing what comfort you can get with a hook and something long and fuzzy :')

I have a few ideas milling about in my head but I am not sure exactly when I will be implementing them for here. For now I may be creating and putting a few finished creations up on Etsy. I will keep you posted when that happens. Also I will be heading to Mississippi for 7 weeks for some military training. Since I will be away from my boys, I will be seeking much comfort from my crochet projects. It will be my sanity away from home.

Anyway, from the wintery heartland of America, I wish you all the best in your projects. Keep warm!  Its snowing like crazy here.

Sunday, December 5, 2010

Simple Pretty Face Cloth

(Copyright Tattiana Talahandra December 2010--  see note below pattern  )

Here is something I made to help in the bath. I love to place a warm washcloth on my face but hate not being able to breath. With this cloth the Double crochet stitches in the middle will help solve that problem. This is also a great gift idea to make that's really quick.  I can get one done while watching a movie.

Materials:
1 ball Sugar'N Cream  100% Cotton Yarn in Light Blue and Hot Purple (or pick your favorite color)
Scrap White yarn
Size H/8 Hook
Yarn Needle

Instructions:
Chain 35
 Row 1 - 12: Single Crochet in each stitch across, Chain 1 then turn (repeat this step until row 13)
Row 13:  Double Crochet in each stitch, Chain 2 then turn
Row 14:  Double Crochet in each stitch, Chain 1 then turn
Row 15 - 27: Single Crochet in each stitch, Chain  then turn (repeat this step up to and including row 27)
Finish off

To create a finishing touch use some white yarn or a complementary color of your choice to single crochet around the edges.
I added an embroidered butterfly on one side  to give it character. Up to you what you wish to do :')

(This crochet pattern is copyright of Tattiana Talahandra (December 2010). DO NOT reprint this pattern, or post it on any other website. You may make a copy of this pattern for your own personal use, but do not include it in any collections, website, or cds. You are welcome to link to this pattern and if you post your own pictures of what you create, please credit accordingly and include a link to this original pattern. )

Wednesday, December 1, 2010

Fitness with something Virtual

Its amazing to me to see that we have come into an age where technology is like something from your favorite scifi movie.  Where a wave of the hand can manipulate data and help you do great things. In this case.... great things to improve your own self.

I am amazed by my Xbox 360 with Kinect.  Even though these products are from Microsoft, I am finding a growing love for this newfound creation of the Kinect where you attach the sensor on your television and are able to play a game without holding the game controller. I love my Wii (by Nintendo) and all the cool games that go with it, but when I would do my fitness games, the controller would slip from my leg with the fitness bands.  I hate having to readjust in mid action during a workout.

I first became curious of the 360's Kinect when a good friend on Facebook was talking about how she could not make it up her steps from the living room after a Kinect workout. I like hearing about game consoles making people get up and do something. This means people have to relinquish the couch and move!    I thought this was the case with the Wii but as more and more people figured out the controls we realized you could sit and still play tennis or do activities on the Wii from two rooms over. I know this is still not a bad thing since it was the Wii that is being used at a local gym here for neurologically impairing muscular disorders, primarily MS patients. Those who cannot stand are having fun being able to play Wii games side by side with kids from the local softball team. This is not a problem to me.  My problem lies with those who can stand and chose to sit.

In comes the difference between the 360 Kinect and the Wii  from what I am seeing so far. With the Kinect you have to stand up in front of the area it directs you. It scans your body and keeps track of all your movements, something you can visibly see on the screen (in some games your avatar will be semi transparent).  I find that this freedom to move about the space is great because there is no controllers to throw through a screen, no straps to fall when you sweat (yes people....you will sweat), and less to worry about breaking unless you decided to have your entertainment in a room full of breakable china.   You will jump, you will run in place and you are training your whole body to play, not just training your thumbs and index fingers. 

One Game I love so far is called "Your Shape: Fitness Evolved". I get to learn Tai Chi and kickboxing!!   You see yourself on screen doing the moves as you work alongslide your on screen trainer. As your trainer moves, you move as in sync as you can make it. I am finding this very helpful since I was trying to learn Tai Chi by video tapes and a stand up mirror. Here everything is on screen in very straightforward terms. I dont feel anything is out of my league. As I complete the activities with my trainer, I unlock new and harder skills to master.

This is still my first week in playing. Lets see how the newness wears and hopefully how my form will look in the next few weeks. The game that came with the Kinect called "Kinect Adventures"  had me embarrassed. As I was learning how to make my avatar jump and control a raft, I was oblivious to the fact the game was taking my picture periodically. At the end of the level, it had some very....um.... flattering shots of myself crouching, jumping, and looking alittle pudgy.  Hopefully my virtual training on the Fitness Evolved will help me look better for the camera.

Overall I am very happy with the Xbox 360's Kinect. Once you get used to not holding something to manipulate game menus, the system and the Kinect games are easy to play.  Key things to remember is your space and your pace.  Set up an area in front of your tv to move freely (about 10 feet long by 8 feet wide) and please only do what you are capable of. Don't overplay those first few days.... trust me on this one....you WILL feel it the next day :')

Saturday, November 13, 2010

Possible Commissions

Greetings Folks!

My first goal with Etsy was to place patterns up and then possible finished creations there as well. I haven't thought about commissions even though I see awesome crafting blogs offering it.

Well here's the deal in the case of my things here. If you like something created, please email me at tattiana.talahandra@gmail.com and please put in the subject line: Commission!  and then tell me in the email about what you wish done. Payments will be made through paypal.

If I can do it then I will let you know and we can set things up from there. Keep in mind that I may have to turn down commissions due to Real life Commitments. I am Active Duty in the US Air Force with the potential of leaving (although will be bringing projects to keep me busy). I also got two boys in cub scouts so life can get busy. Usually a project from start to finish can take me about 3 or 4 days to complete one item, sometimes less.  Yes I am not that fast but when this is a skill that is my calming activity, you don't want to rush it :')

Allergy Warning:  I have cats and my roomate has a bunny. One Kitty loves to help with my yarn tension ..... alot. She's sitting calmly next to me as I am writing this so if you or the person you are gifting for has a cat allergy then you may need to look for another crafter to create the gift.

Thank you very much!

Monday, November 8, 2010

GIR Scarf Pattern

GIR Scarf
By Tattiana Talahandra  -  November 2010 (see copyright below)


Abbreviations:
SL= Slip Stitch
SC= Single Crochet
DC= Double Crochet

Difficulty Level is EASY
For this pattern you will need basic knowledge in Crocheting.  In this pattern you will be working in rounds. Creating a Ring with DC (double crochet) stitches.  For more information, I found websites like crochetpatterncentral.com  and youtube a big help.

Supplies:
Skeins of worst weight yarn in Green, White, and Black .  I used Caron’s Simply Soft in Limelight, White, and Black....its sooo soft and I love the muted sheen.  You will also need a small scrap of red for the tongue.
Hook size  I/9 and G/6
stitch markers

This scarf was inspired by Gir from the Nickelodeon TV series "Invader Zim". He is a SIR robot that disguises himself as a Green Dog to fool the humans.  

Create Basic Scarf
 Use  I/9 hook and green yarn

1.        1. Chain 20
2.       2. SC 19 stitches into the chain, Ch 1 then turn
3.        3. Repeat step 2 until the scarf is as long as you need.  A good rule of thumb is make the scarf as long as the  person it is intended for. 
4.       4. Once it is at the length you desire. Finish off.
5.        5. (optional)  you can add a single row of 19 SC stitches to each end of the scarf with black yarn .
6.       6. Add a nice decorative black stitch (basic sewing stitch) down the center of the Scarf using a yarn needle and some black yarn. See picture below.  To know where I was stitching, I marked every so often where I needed to go with plastic stitch markers.  You can use a fabric washable marker or safety pins but use something to help mark your path for stitching.  

I used small plastic stitch markers to keep my stitches straight
 

Ears:  (make 2)
     Use black Yarn and a size I/9 hook
     Chain 6
     SC across (5 stitches ). Finish off

Eyes:  (make 2)
     Use G/6 Hook and white yarn
     1. Chain 3, SL to join
     2. DC  10 in the ring, SL to join
     3. 2 DC in each stitch. Around.   SL to Join (20 stitches)
     4. Take some black string and knot the end twice like in the picture. Pull the loose ends through the center of the white eye and secure.


Red Tongue:
    Use some scrap red yarn and a size G/6 hook
    Chain 4
    SC  across (4 stitches), finish Off

Assemble Time!
Get out your yarn needle!!
Stitch on the eyes as shown.
The tongue I placed a little lop sided from the center to give him a more comical look, just like in most of his pictures.
Don't forget to give it a cute black nose!  Just embroider in a Triangular stitch between and slightly below the eyes.


Enjoy!
This crochet pattern is copyright of Tattiana Talahandra (November 2010). DO NOT reprint this pattern, or post it on any other website. You may make a copy of this pattern for your own personal use, but do not include it in any collections, website, or cds. You are welcome to link to this pattern and if you post your own pictures of what you create, please credit accordingly and include a link to this original pattern.

Tuesday, November 2, 2010

GIR Beanie!

Yes folks I created another beanie pattern. This time it was for a friend who loves GIR from Invader Zim on Nickelodeon.


I am liking the idea of creating hats and things people would have fun wearing. Wacky but EASY things to create. The reason why I started so late in learning to crochet was due to my mindset. I had no motivation to create doilies, baby booties or afghans.  I was inspired by the amigurumi movement. I loved the idea of making people smile with small toys or a funny hat. Now  I have alot of ideas in my head that have to be shaped by the yarn.

The holiday season is upon us. Soo many things to create. Sooo little time.  This pattern I have listed on Etsy and I will be adding a GIR scarf to this blog soon.  Keep checking back for more details and thank you for reading!

This interested in this hat pattern please check out  my Etsy store

Tuesday, October 26, 2010

In the works

Sorry for my absence. I been working, crafting, creating things for activeworld's AWRPG, and also getting involved with my boy's cub scouts.

Good news is a new wacky beanie pattern is in the works. I have a scarf idea to go along with it that should make a great set for the holiday season. Will be posting the results as soon as things are ready.

As a side project, I been working on this cute Toothless Dragon made by Feathereddragon. Take a look at how cute this is  http://feathereddragon.deviantart.com/art/Crochet-Toothless-the-Dragon-158419641 
She's a very talented lady and going to college. If you like what you see, get in touch with her to get the pattern. I am sure your kids will love it....shoot I have adults that want me to make them one!!    hee hee

Thursday, September 23, 2010

Hello Kitty Beanie

Greetings everyone

With much advice and coaxing, I have placed my first pattern up on Etsy for sale. I created my very own Hello Kitty Beanie that was designed for my size head (about 22inches) but the pattern is written in a way where you can tailor it just like my other beanie patterns.

A big thing about these patterns is that I am writing them for the Easy and Beginner level. Yes you can create many beautiful things with the basic of stitches. You don't have to be a pro at this or be a writer for a major magazine. These patterns are meant anyone of any age to get into crocheting.

For those interesting in purchasing this pattern, you can find it at http://www.etsy.com/listing/57078825/womens-hello-kitty-beanie-crochet

Pattern is now FREE on this site

I would put up a picture of the person the hat was created for but she's camera shy. Oh well :')

Have a great day and keep creating out there!